

Build a home cybersecurity lab on one laptop, legally, in 20 minutes.
You do not need a dedicated server, a managed switch, or ESXi to start practising security. 16 GB of RAM and a free hypervisor cover 90% of the road.
The mythology around home cybersecurity labs is intimidating: dedicated server, three NICs, a managed switch, ESXi licences, a homelab subreddit's worth of acronyms. The truth is that for the first 90% of practical learning, you need exactly one laptop with 16 GB of RAM and an SSD. This article walks you through the smallest viable lab end-to-end – what it is, what hypervisor to pick, how to build it, how to verify isolation, what to do with it on day one, and how to know when you've outgrown it.
By the end you'll have three virtual machines on an isolated network: an attacker box, a vulnerable Linux box, and a vulnerable web app. You'll know how to break them on purpose, restore them in seconds, and capture the network traffic between them. And you'll do all of it on hardware you already own, legally, without touching anyone else's systems.
1. What "lab" actually means (and what it doesn't)
A home lab is an isolated environment where you can run software you would not run on your normal machine – vulnerable VMs, attacker tools, kernel-level instrumentation, malware samples – without putting your day-to-day computer or other people's networks at risk. Two properties are non-negotiable.
Isolation means the lab cannot reach your home network, your work files, or the internet unless you explicitly route it. A misconfigured lab that can SSH into your router is not a lab, it's a liability. We'll verify isolation in section 4.
Reset means you can break a VM on purpose and restore it to clean state in seconds, not hours. Hypervisor snapshots make this trivial. A lab without snapshots is a lab where you'll be afraid to experiment, which defeats the point.
Everything else (more VMs, more RAM, multi-segment networks, a managed switch) is a convenience. The minimal lab below trains the same fundamental skills as a $3,000 rack: the difference is comfort, not capability.
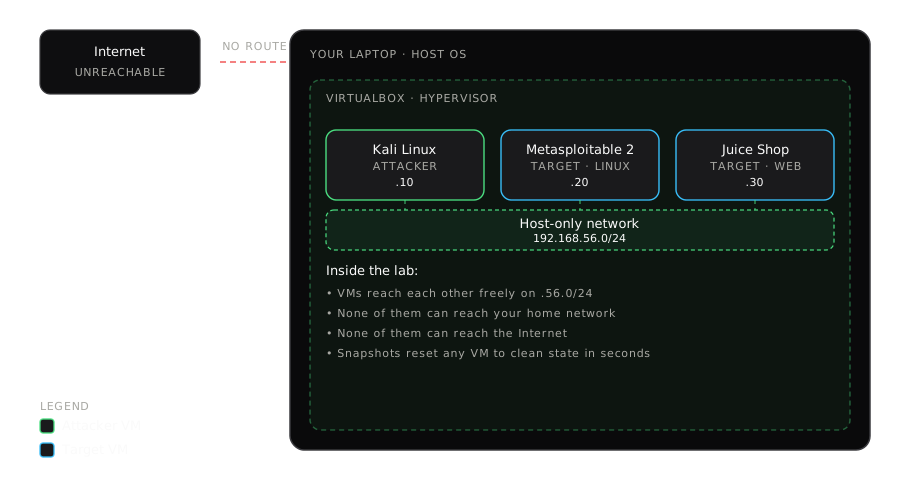
That's the whole architecture, laid out: a laptop running VirtualBox, three VMs talking to each other on a private network that goes nowhere else. We'll build exactly this.
2. Choose your hypervisor in 30 seconds
The hypervisor is the software that runs your virtual machines. There are dozens. For a beginner home lab, the choice is between four. Use this tree:
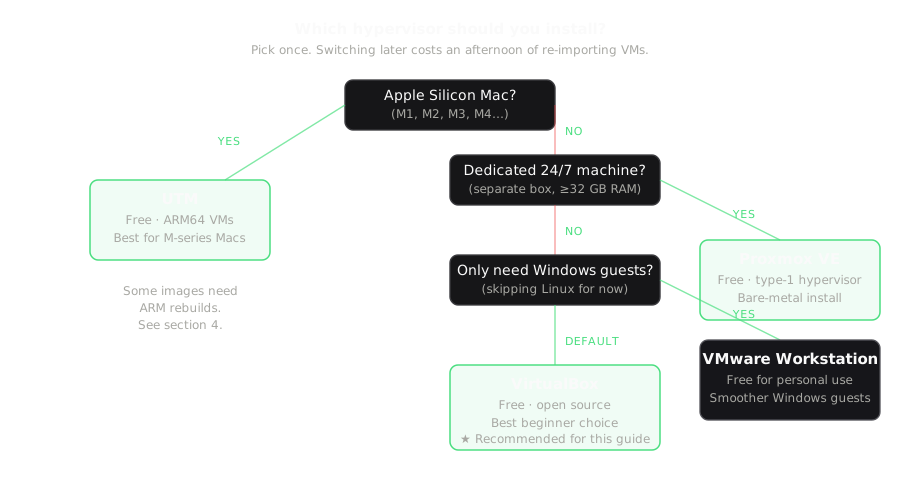
For everyone reading this on a regular laptop, the answer is VirtualBox. It's free, it's open source, it runs on Linux/macOS/Windows, it has stable snapshot support, and almost every prebuilt VM image you'll download in this article ships with a VirtualBox profile baked in. The rest of this guide assumes VirtualBox; the principles transfer cleanly to any of the others.
| Hypervisor | Cost | Strength | Pick it when… |
|---|---|---|---|
| VirtualBox | Free | Universal, beginner-friendly | You want it to just work on any laptop |
| VMware Workstation Pro | Free (personal) | Smoother Windows guests | You're running mostly Windows VMs |
| UTM | Free | Native on Apple Silicon | You're on an M-series Mac |
| Proxmox VE | Free | Bare-metal, web UI, clustering | You have dedicated hardware |
A note on Apple Silicon
If you're on an M1/M2/M3/M4 Mac, most "classic" prebuilt lab images (Metasploitable 2, older Kali appliances) are x86 only. You have three options. The cleanest is to use UTM with ARM64 versions of Kali and Parrot, and use OWASP Juice Shop as your vulnerable target (it's a Node app, runs natively on ARM). The other two are slower: run x86 images through Rosetta-emulated VirtualBox (sluggish but works), or get a cheap x86 mini-PC and SSH into it. For this guide, we assume you're on a regular x86 laptop.
3. The 20-minute build
Once your hypervisor is installed, here is the exact sequence. Total time, including downloads: 30-60 minutes depending on your connection. Active hands-on time: 20 minutes.
Step 3.1 – Create the isolated network
In VirtualBox: File → Tools → Network Manager → Host-only Networks → Create. Name it breachfolio-lab. Set the IP range to 192.168.56.0/24 (the VirtualBox default – fine for this). Disable DHCP for now (we'll assign IPs manually so the diagram above stays accurate). You should see the new breachfolio-lab network listed with the 192.168.56.0/24 range once it's created.
This creates a virtual network adapter on your host that exists only inside VirtualBox. VMs attached to it can talk to each other and to the host on this subnet, but they can't reach your physical network or the internet. This is the lab's perimeter.
Step 3.2 – Download and import Kali Linux
Kali Linux is a Debian-based distribution that bundles every offensive-security tool you'll need for the first six months: nmap, metasploit, burp-suite, wireshark, hashcat, john, sqlmap, and about three hundred more. Installing them by hand on a vanilla Linux box is a multi-day distraction; the Kali team has already done it.
Go to the official Kali downloads page, pick "Virtual Machines", and grab the prebuilt VirtualBox appliance (a .ova file, ~5 GB). In VirtualBox: File → Import Appliance → choose your .ova → Import. After import, before booting, edit the VM's Network settings: change Adapter 1 from "NAT" (the default) to "Host-only Adapter" and select your breachfolio-lab network.
Boot it. Default credentials are kali / kali. Once you see the desktop, open a terminal and set a static IP:
$ sudo nano /etc/network/interfaces
# add:
auto eth0
iface eth0 inet static
    address 192.168.56.10
    netmask 255.255.255.0

$ sudo systemctl restart networking
$ ip a   # verify eth0 has 192.168.56.10
Now shut down the VM (sudo poweroff) and take a snapshot called clean-base. From now on, anything you break – wrong package install, accidental rm -rf, bricked X server – is one right-click away from being undone.
Step 3.3 – Download and import Metasploitable 2
Metasploitable 2 is an intentionally broken Ubuntu 8.04 system. It's a museum of bad security practice: weak SSH keys, default credentials on half a dozen services, an FTP backdoor, a vulnerable web app stack, a misconfigured Samba, an exploitable PostgreSQL. It is glorious to learn on and dangerous on the open internet, which is exactly why we keep it on the host-only network.
Download from Rapid7's archive (it's a .zip containing a .vmdk disk file, ~870 MB). In VirtualBox: New → Type: Linux → Version: Ubuntu (32-bit) → 1024 MB RAM → Use existing virtual hard disk → point to the .vmdk. After creation, set Adapter 1 to the same breachfolio-lab host-only network.
Boot it. Login is msfadmin / msfadmin. Set a static IP:
$ sudo nano /etc/network/interfaces
# add:
auto eth0
iface eth0 inet static
    address 192.168.56.20
    netmask 255.255.255.0

$ sudo /etc/init.d/networking restart
$ ifconfig   # confirm eth0 has 192.168.56.20
Shut down. Snapshot. Call it clean-base. (Same name pattern across VMs makes scripting easier later.)
Step 3.4 – Spin up OWASP Juice Shop
Juice Shop is a deliberately vulnerable web app – a modern Node.js single-page app with dozens of intentional flaws covering every OWASP Top 10 category. It's the best target you'll find for practising web testing. You don't need a full VM for it; you can run it in a small Ubuntu Server VM (or in a Docker container, but for the sake of consistency we'll do a VM here).
Create a tiny Ubuntu Server 22.04 VM (512 MB RAM is plenty). Same host-only network. Inside it:
# Install Node and run Juice Shop
$ sudo apt update && sudo apt install -y nodejs npm
$ git clone https://github.com/juice-shop/juice-shop.git
$ cd juice-shop
$ npm install --omit=dev
$ npm start
# Juice Shop is now listening on :3000
Static IP this one to 192.168.56.30. From Kali, point your browser at http://192.168.56.30:3000 and you should see a colourful broken e-commerce site. Snapshot it (clean-base again).
4. Verify isolation (do not skip this)
This is the single most important step. A "lab" that can reach the internet or your home network is, by definition, not a lab. From Kali, run these checks:
# Should SUCCEED - you can reach your other lab VMs
$ ping -c 2 192.168.56.20    # Metasploitable
$ ping -c 2 192.168.56.30    # Juice Shop

# Should FAIL - you cannot reach the internet
$ ping -c 2 8.8.8.8
$ curl -m 5 https://example.com   # should time out

# Should FAIL - you cannot reach your home network
# (substitute YOUR home router IP - usually 192.168.0.1 or 192.168.1.1)
$ ping -c 2 192.168.1.1
If anything in the "should fail" block succeeds, stop and fix the configuration before going further. The most common cause is leaving Adapter 1 as NAT, or adding a second adapter for "convenience" that bridges to your physical network. Check Network settings on every VM and confirm there is exactly one adapter, and it points to the host-only network.
Once verified, you have a working lab. Everything that follows is what to do inside it.
5. What to practise on day one
Here is a starter playlist of hands-on exercises. None of them require new downloads.
Reconnaissance with Nmap
On Kali, run:
$ nmap -sV -A 192.168.56.20This does a service-and-version scan of Metasploitable. You'll get a wall of open ports – FTP (21), SSH (22), Telnet (23), SMTP (25), DNS (53), HTTP (80), and many more. Pick three and read the version strings. Many are old enough to have well-known CVEs. Look them up. You're now thinking like an attacker, ten minutes in.
Exploitation with Metasploit
Metasploit is preinstalled on Kali. Launch it with msfconsole. Try the classic textbook exploit: the vsftpd 2.3.4 backdoor on Metasploitable:
msf6 > use exploit/unix/ftp/vsftpd_234_backdoor
msf6 exploit(...) > set RHOSTS 192.168.56.20
msf6 exploit(...) > run
If everything is wired correctly, you'll get a root shell on Metasploitable. Take a moment to understand what just happened: a vulnerability in the FTP server allowed remote code execution, you fired the exploit, and you now own the machine. Restore the snapshot when you're done. (Yes, the whole point is that you can.)
Web testing with Burp Suite
Open Burp Suite (preinstalled on Kali). Configure your browser to use 127.0.0.1:8080 as a proxy. Visit Juice Shop at http://192.168.56.30:3000. Every request flows through Burp; you can see it, edit it, replay it. Try the "Score Board" challenge – it's a built-in scoreboard of vulnerabilities you can find. Solving them is the best practical introduction to web security you'll get without breaking the law.
Traffic capture with Wireshark
On Kali: sudo wireshark. Capture on the eth0 interface. From another terminal, run any of the Nmap scans above against Metasploitable while the capture is running. You're now watching attacks happen in real time at the packet level. Filter by tcp.flags.syn == 1 and tcp.flags.ack == 0 to see only SYN packets. Welcome to the bottom of the stack.
Detection: read your own attacks
This is the bit most beginner labs skip and most defenders need most. On Metasploitable, before you attack it, open a shell and tail the auth log: sudo tail -f /var/log/auth.log. Now run a hydra brute-force from Kali against SSH: hydra -l msfadmin -P /usr/share/wordlists/rockyou.txt 192.168.56.20 ssh. Watch the lines pour into the log. That's exactly what a blue-team analyst sees on a real network. Knowing what an attack looks like from the defender's seat is half the job.
6. Workflow that prevents pain
Three habits that will save you hours over the first few months.
Snapshot before every experiment. Even ones you think will work. Especially ones you think will work. Snapshots are free and instant. Restoring from one is a single click. Losing two hours because you broke a config is preventable.
Keep notes per VM. A simple text file per VM listing the IP, the credentials, the snapshots you've taken, and the changes you've made since the last snapshot. When you come back next week, you'll thank yourself.
Power down what you're not using. Three VMs at idle take 1.5-2 GB of RAM and 10-15% of one CPU core for nothing. Suspend or shut down the ones not in play.
7. Troubleshooting the five things that always break first
"Kali boots to a black screen / glitchy display."
This is the VirtualBox graphics controller. Power off the VM, go to Settings → Display → Graphics Controller, switch from "VMSVGA" to "VBoxSVGA" (or vice versa), and increase video memory to 64 MB. Reboot. Resolves 95% of display problems.
"My VM has no network at all."
Three things to check, in order: (1) the adapter is actually attached – Settings → Network → Adapter 1 → Enable Network Adapter; (2) the attachment type is "Host-only Adapter" and the right network is selected; (3) inside the guest, the interface is up (ip link set eth0 up). If all three look right, restart the VM with the network adapter freshly toggled off-and-on.
"The VM is extremely slow."
Almost always one of: (a) virtualisation extensions disabled in your laptop's BIOS (VT-x on Intel, AMD-V on AMD – boot into BIOS, enable them, save, reboot); (b) the host is running out of RAM because you're trying to run too many VMs at once (Activity Monitor / Task Manager will tell you); (c) the disk image is on a slow external drive – move it to your internal SSD.
"VirtualBox crashes on import."
The .ova is probably corrupt – re-download it and verify the SHA-256 hash against the publisher's page. The second most common cause is running out of disk space mid-import; VirtualBox needs roughly 2× the .ova size temporarily.
"I can ping Metasploitable from Kali but I can't reach its web server in a browser."
The Metasploitable web stack listens on the default ports but the browser inside Kali doesn't know about your lab. Make sure you're typing the full URL with port: http://192.168.56.20 for HTTP, http://192.168.56.30:3000 for Juice Shop. And confirm the service is actually running on the target (sudo service apache2 status on Metasploitable, npm start on Juice Shop).
8. The legal line, in one paragraph
Everything described in this article happens on machines you own, on a network that isn't connected to anything else. That is legal everywhere. The moment you scan, probe, or attempt to access a system you do not own and do not have written permission to test, you are breaking the law. The Computer Misuse Act (UK), the Computer Fraud and Abuse Act (US), Spain's Código Penal articles 197 bis onwards, Germany's StGB §202a-c, and equivalents elsewhere all criminalise unauthorised access. There is no "but it was educational" exemption. There is no "I was just looking" exemption. Stay inside the lab. If you ever want to test against something larger, use legal practice ranges: Hack The Box, TryHackMe, PortSwigger Web Security Academy, OWASP's authorised challenge sites. They exist exactly so you don't have to take the risk.
9. When to upgrade
The laptop lab carries you a long way. You'll know it's time to outgrow it when one of these starts limiting you regularly:
- You consistently need five or more VMs running at once (Active Directory labs, multi-tier networks, segmented architectures).
- You want to practise scenarios that need real network segmentation – multiple VLANs, a firewall in the middle, a DMZ. These can be simulated with internal networks in VirtualBox, but it gets fiddly past two segments.
- You want the lab running 24/7 for long-duration detection engineering experiments – say, observing what a SIEM looks like under a week of simulated attacker traffic.
- You're studying for a hands-on cert (OSCP, CRTO, CRTP) where the exam environment has dozens of machines and you want to practise at that scale.
The cheapest upgrade is a second-hand mini-PC (Intel NUC, HP EliteDesk Mini, Lenovo ThinkCentre Tiny) with 32 GB of RAM and a 1 TB NVMe. €200-€400 used. Install Proxmox on it, leave it under your desk, manage it through the web UI. You'll feel the difference immediately, but until you actually feel constrained, the laptop wins on the most important axis: you can use it at any hour, anywhere, without setup friction. Hours of practice beat hardware every time.
10. What to read next
Once your lab is up, the natural progressions are: more attack practice (PortSwigger Academy, TryHackMe), more defence practice (deploy Wazuh, Security Onion, or Suricata on a fourth VM and watch your own attacks light it up), or more network depth (add a pfSense VM between subnets and learn firewall rules by inspection). Each of those is its own deep dive, and each of them starts with the lab you just built.
Frequently asked questions
Is it legal to run Kali Linux and Metasploit on my own laptop?
How much RAM do I really need for this lab?
Should I use VirtualBox or VMware Workstation Player?
What if I have an Apple Silicon (M1, M2, M3, M4) Mac?
Can my lab actually compromise my home network if I configure it wrong?
Daniel A. and Óscar S. run Breachfolio, a small independent site about security and AI. This article was drafted with AI assistance and reviewed by a person before it went live. We write from documentation, vendor sources and published research rather than from original lab benchmarks, and we link a source in the sentence that relies on it. How we work · About us